Sunday, December 18, 2005
Day 1 - Getting Started
The plan:
A wood / foam composite recumbent bike frame using 1/4" sandewood plywood (strong, light and good looking), and 2" Styrene insulating foam. All sourced from the local home improvement store. Parts will be sourced from donor bikes.
The Goal:
Something that works of course. Minimal Welding/brazing (if any). Dropouts will be custom aluminum and the headset will be supported by custom aluminum brackets. Controls should be comfortable and the ride should also be comfortable too. The bike must have storage for my backback for commuting to class. I should also be able to drive it up to school (200 miles) and be able to lock it up safely outside.
The Design:
Because I am not yet skilled enough to do a Finite Element Analysis (don't fret on what that means), I will be basing my design off of similar recumbents that may be found on this website:
http://www.blids.nl/gallery/PlywoodRecumbentBuildingworkshop2003 . I wish to ensure a success so going off a shape that already works is a great start.
My sketch:
 Not to Scale:
The design will be fluid and form to my body as best I can.
Now to the actual day:
-----
I got parts today from the local home improvement store. With three donor bikes already secured, I'm ready to start building a frame. As my break is short, I must work quickly and carefully. I bought two sheets of sandewood ply for about $17ea.USD + tax. My girlfriend Carrie helped me load and unload the wood into the back cabana house: AKA bike build ground zero.
I put one piece of wood flat on the ground and I took two of my 24" wheels and set them on the wood for positioning. I drew a rough sketch of the bike using pencil. By sitting in a vertical position mimicking the rider position, I was able to get rough measurements of the length and height (by falling over :P).

 Click the Image For Bigger View. The Sketch is just barely visible.
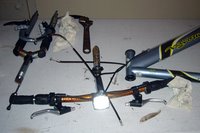
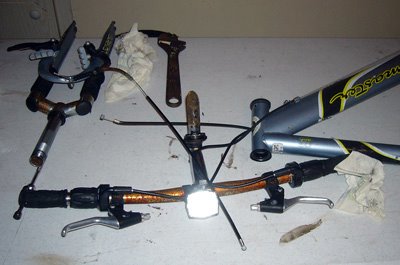
One Headset disassembled.
A wood / foam composite recumbent bike frame using 1/4" sandewood plywood (strong, light and good looking), and 2" Styrene insulating foam. All sourced from the local home improvement store. Parts will be sourced from donor bikes.
The Goal:
Something that works of course. Minimal Welding/brazing (if any). Dropouts will be custom aluminum and the headset will be supported by custom aluminum brackets. Controls should be comfortable and the ride should also be comfortable too. The bike must have storage for my backback for commuting to class. I should also be able to drive it up to school (200 miles) and be able to lock it up safely outside.
The Design:
Because I am not yet skilled enough to do a Finite Element Analysis (don't fret on what that means), I will be basing my design off of similar recumbents that may be found on this website:
http://www.blids.nl/gallery/PlywoodRecumbentBuildingworkshop2003 . I wish to ensure a success so going off a shape that already works is a great start.
My sketch:
Not to Scale:The design will be fluid and form to my body as best I can.
Now to the actual day:
-----
I got parts today from the local home improvement store. With three donor bikes already secured, I'm ready to start building a frame. As my break is short, I must work quickly and carefully. I bought two sheets of sandewood ply for about $17ea.USD + tax. My girlfriend Carrie helped me load and unload the wood into the back cabana house: AKA bike build ground zero.
I put one piece of wood flat on the ground and I took two of my 24" wheels and set them on the wood for positioning. I drew a rough sketch of the bike using pencil. By sitting in a vertical position mimicking the rider position, I was able to get rough measurements of the length and height (by falling over :P).
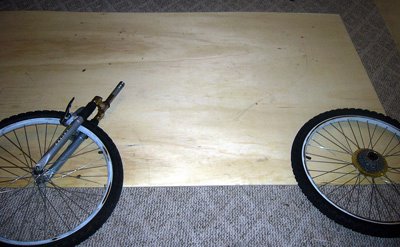
 Click the Image For Bigger View. The Sketch is just barely visible.
One Headset disassembled.
# posted by Trebuchet03 @ 7:47 PM 
![]()